Saturday 30 April 2011

Brompton on a bike

Unfortunately a temporal rift opened up in the space-time continium resulting in my bike being at work but it's rider at home.This little pickle would normally mean participating in somekind of vulgar act such as paying another £2.80 to a bus driver who thinks he's Lewis Hamilton. Thankfully a Brompton folds up small enough to fit on the normal rack of my Nexus. so I rode that in then the Nexus back. Just 4 bungess and a bit of cardboard to protect the paintwork. Even enough room for my pannier to sit in it's normal place.

Turns out those stupid barriers on the bridge do have one use. On that same note, as this exact spot, last week I passed a man pushing his wife in her wheelchair. They were using the cycle path as the pavement is too awkward (thanks to the barrier). What I wasn't expecting was a little old lady to mutter 'f*cking barriers' in the form of thanks for me pulling up to let them past.

Sunday 24 April 2011

Cree LED in a vintage bicycle headlamp

Take one old style front bicycle headlamp bought from ebay for about £4. (this is a Halfords lamp, posher Raleigh etc ones will cost double+)
And one Cree torch of somekind bought from China of ebay. Mine is a 3xAAA powered 5W Zoomable Cree Headtorch which cost £5 posted. 

Remove the rather sparce internals of the original lamp
Disassemble the Headtorch.
Go 'Ooooh' & 'Aaaah' at the tiny lens on the Cree LED. Decide whether or not you want to keep the larger glass lens & the zoomability. I decided against as the original lamps lens created a good light spread.
These are the only bits that we'll need from the Headtorch now. the LED unit has been de-soldered from the board to get it out of the casing. It will be resoldered later.
Discover that the LED unit and the Halfords lamp unit's reflector dish were made to measure for eachother.
Then discover that the headtorch's little on/off button is the exact fit for the original lamps red running light. - glue on/off switch in place. Remove rust/paint to your choosing.
Work out nice position for the battery pack and Alraldite in place. Work out some way of keeping batteries from falling out later - tape will do for now. 
Put it all back together. Paint the bracket in Black Hammerite. & fit to the bike.

For other inspiration: Here's one made earlier by my brother using a Raleigh vintage lamp, painted with cream Rustoleum (Great stuff), a switch on top and using a Cree, powered by a large 18650 battery.


Thursday 21 April 2011

The cargobike bloke....

Who is he. Nobody knows. He's a Manc mystery on wheels wrapped in an 3/4 length enigma. He pops up in more places than Droopy the Master Detective and even has his own 8 Freight fan page. Well here he is now on tape. Well ok his backside on tape. ....Never noticed the cargobay on 8 Freight was uncentred til now. Interesting that.


p.s I'm not wheelhugging. It's just a cheapo camera that's not very wide angle.
p.p.s @ 0.55 it sound like a tram honks at me!.....it was actually warning an ipod zombie about to cross the tracks.

Tuesday 19 April 2011

Brazing a brake-arm clip for an X-FD drum brake

Warning!: Ghetto, probably unwise, metal work below.

My Stowaway build includes a Sturmey Archer X-FD 70mm drum brake in the front wheel. Drum brakes have a long reaction arm which have to be secured to the fork in someway to provide a fixed point for the braking action to react against. This is usually done by using a clip-on fastening that is available in a variety of sizes, or the simplest way is to use a hoseclip (this is how my Sachs drum brake is attached to my Nexus bike). But since the Stowaway was stripped of paint anyway it made sense to install a permanent brake-arm clip on the fork. I'd already had my first go at welding with the Hopper, so this time it was a chance to have my first go at brazing.

This is not exactly the high-quality methods that will be employed in full-scale bike building to say the least, but the end result is good enough for me in my garage. Kudos go again to my brother who showed me how to do this using a canister of Mapp gas (ment for plumbers fitting copper piping) with the nozzle tightened slightly to get a smaller flame. Still, by brazing standards the flame was big and ugly, heating up a much larger area than needed - which is why the braze spreads so far. In anycase, brazing is such a nicer process to do than welding, mainly because you can take your time and fuss less with awkward gloves & face masks.

Here's a quick run down & a video

A small tab, just the right size to fit the X-FD brake arm, made out of a piece of scrap bracket.
Start heating it up
Beginning to melt the first bit of brass into the gap. Given up on the crappy mole grips by now, they kept falling off from the heat.


Decent amount of braze on there now
The brazed clip after a bit of filing
Fits nicely & when all painted up this is a much more elegant solution to securing the reaction arm than the alternatives.


Wednesday 13 April 2011

Through the eye of the needle: Pinch points for experts


Hart Rd, in Fallowfield is one option for avoiding the chaotic horror show that is Wilmslow Rd in the Afternoon. However, quieter residential routes such as these just don’t provide the technical challenge to test your speed, balance & perception skills in the same way as double parked cars or doors flying open or Magicbus drivers attempting to do 30mph in a traffic jam. Helpfully the council tackled this issue head on as part of their traffic calming measures on Hart Rd. In a true test of any cyclists skill you can feel the adrenaline rush that’s been missing from your relaxing route home by attempting to thread the ‘Eye of the Needle’ using the cycle lane provided through the build-out.

10 points per build out ‘threaded’
20 points per build out ‘threaded’ with your eyes closed
40 points per build out ‘threaded’ with your eyes closed & doing a no-handies
80 points per build out ‘threaded’ with your eyes closed, no handies, no pedalies whilst patting your head and rubbing your tummy simultaneously

5 point bonus per build out ‘threaded whilst screaming ‘Weeeeeeeeee’


Monday 11 April 2011

Sachs 5 speed Torpedo Pentasport hub gear


This is a Sachs 5 speed Torpedo Pentasport hub gear - which is quite a mouthful of a name for a nice little german hub gear. This is the hub that will be going into my Stowaway build. It isn't stamped with a year and month as Sturmey Archer's handily are, so I can only guess at it's age. It is marked Sachs so precedes their taking over by Sram in 1997 and the 5 speed was introduced in 1987, so it's from sometime within that period.

It has got pretty respectable range of 251% which puts it a fair bit wider than a standard 3 speed (177%) and not too far away from my Shimano Nexus 8 (306%). The size of the steps between gears is also nice and even, with slightly shorter steps at either end of the range (1-2 & 4-5).

These Sachs/Sram hubs don't use a pull-chain that shorter range 3 speeds use, instead it has a 'clickbox' which clamps over the top of two push rods. The push rods are sleeved one inside of the other and when pushed in certain combinations will activate all 5 gears in sequence. It's this certain sequence that is dealt with inside the clickbox. The big advantage of this is that there is no adjustment to do, you just screw on the clickbox and hey-presto all 5 gears are selectable. The possible disadvantage of this is that the shifter, cable and clickbox come as a one piece unit. They are seperable, but each part is very specific and you can't for example just replace the cable as the cable is a solid wire with a special end fitting. You see most bike cables just have to pull, this cable has to push & pull. - which is a different kettle of fish. Basically if you need a new one, just go on ebay.de and buy the whole thing for a few euros.

Another aspect to this hub is the metal cover plate on the drive side of the hub. It's quite large. Meaning that the hub can't accept very small sprockets such as 15/14/13 maybe also 16. I haven't tested further, but it should be ok with sprockets larger than this. You can see in the wheelbuilding photos below that I've put a 15 tooth on just to hold the plate on whilst I do the build and this doesnt have enough clearance. This would probably make the hub unsuitable for smaller wheels such as a Brompton as they need small rear sprockets to maintain.a sensible gear range. But on this bike with 451mm wheels a 46 tooth front ring and, for example, an 18 tooth rear would give gear inches of 32 to 81 - a nice range.

I did open up the clickbox on mine out of simple curiousity and it was a bit of a mixed bag, it was a good thing because I renewed the grease inside of it, but a bad thing because it is quite fiddly to put back together.


Above is a view of the inside of the clickbox with some new grease in there. There isn't anything to worry about with this though, the casing and components are very solid and it is very well sealed. I only opened mine to regrease it because this thing is a minimum of 14 years old.

I've had this hub for a while, having got it off ebay in the spur of the moment sometime last year. So when I started thinking about what to put in my Stowaway built this seemed the obvious choice. Before I started building it into a new 451mm wheel I opened it up for the first time just to check if it needed regreasing.


It's a very simple hub to open. Much simpler than for example the well known Sturmey AW 3 speed. All you have to do it undo the two nuts on the none drive side (shown above),....
....then slide off the two retaining washer thingies.....

...and take off the big plastic dust cap. Once you have done that then the entire hub shell just lifts away from the internals - see below.


At first glance the inside of the hub doesn't look too delightful. but looking closer its actually very well greased up and doesnt require any attention. It has been regreased at somepoint by a previous owner using somekind of grey moly grease. Whatever it is, it is working just fine, so for the time being I'll leave it as it is. Below is the internals side by side with the shell.

With that done it's time to build it into the rim.
First of all the wheel needed a slight dish and fingers crossed this will all line up ok when the bike is built. Secondly the Damon Rinard spoke calculator Excel spreadsheet on Sheldon Brown's site came up with needing spokelengths of 198.5mm and 201.1mm for a 2 cross pattern. However I knew from building the Hopper that the calculator seems to overvalue the lengths by around 6mm. Maybe I'm using it wrong (I'm pretty sure I'm not), but I ordered lengths of 192mm and 194mm from SJSCycles and low and behold they were the perfect size. The rim is a Sun Ringle ICI-1 from Chainreactioncycles. They are very nice rims and the cheapest 451mm that it seems you can get with 36 spokeholes.


Starting off by loosely fitting a spoke from every other flange hole to every 4th hole along rim hole.

Then doing the same on the otherside
Now you start crossing the spokes by filling in the gaps on the hub flange with spokes coming in from the opposite side, crossing over the top of the next spoke and crossing under the spoke beyond that. That probably makes no sense, but there are much better wheelbuilding tutorials on the web than I can offer, besides the best way to understand it is to just build one and find out.
And repeat on the opposite side. Easy really. This is the first time I've built a wheel using brand new rims and I can tell you it is infinitely easier than using secondhand rims or existing ones from your bike. It simply laced up and was running tight and true without the slightest bother. (The Hopper wheels - built from well used BMX rims where the complete opposite and a real pain in comparison)


Wednesday 6 April 2011

Shimano Nexus 8 Review & Regrease


I've had my Nexus 8 hub for about 9 months now. In that time it's been ridden almost everyday of the week in all weathers, in particular through a very snowy winter period when temperatures were down to -9 at times. I bought it second hand off ebay, meaning it had done at least X? number of miles before I started riding it. I guess this means someone had already 'bedded in' the hub first so I can't comment on how the Nexus 8 runs during that period. I can however say for certain that it once bedded in and doing decent daily mileage the hub performs beautifully, smooth and reliably.

I commute a minimum of 15.5 miles per day and often do as much as 20 miles depending on the route, meaning the hub has been doing around 80 miles + on average per week.

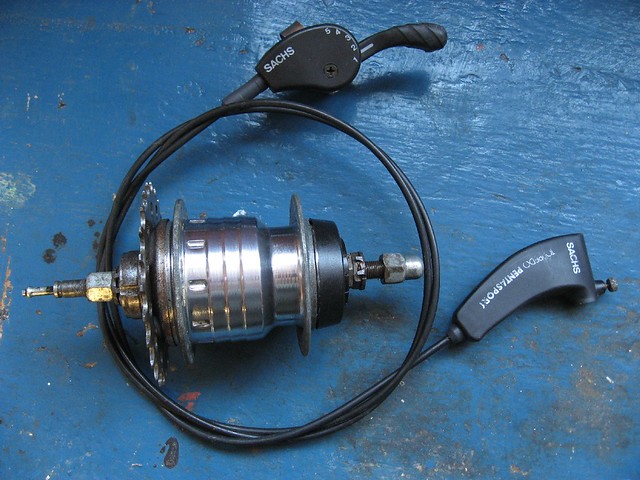
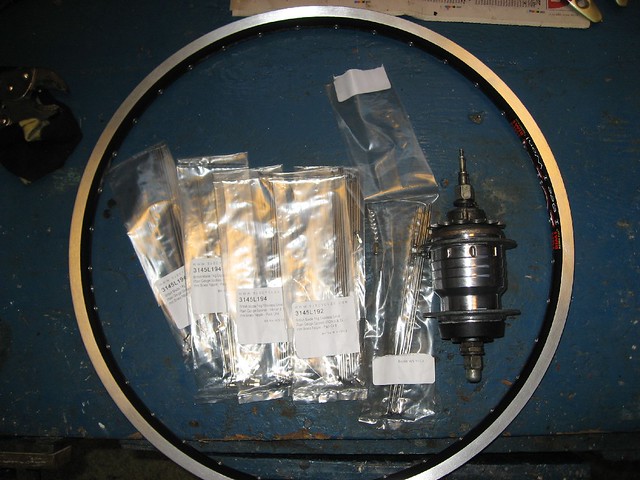
My hub is the SG-8R31 which I think is the current standard model of the Nexus 8. The SG-8R36 being the premium redband version which is better in some way (possibly rated for off-road use, I'm not sure. The alfine certainly is for off-road use though and also takes a disc brake). If you google for reviews and info about Nexus 8 hubs it can be easy to be put off when you come across the odd forum thread or blog post complaining about their hub being ruined by water ingress. It's my guess that these issues will all be relating to earlier versions of the hub such as the original SG-8R20 which may have had different designs of seals. 

The other possibility is that the issues have arose on hubs which have a roller brake fitted. If I was to fit a roller brake to my hub it would involve removing the plastic cover and an aluminium cap from one side to reveal the roller brake attachment. The problem with this that those two items do a very good job of sealing the hub on this side, without them - maybe the roller brake is not as good at providing a seal. This is total speculation on my part, but it does make sense when you are examining the hub itself. All I can say for my hub is that water ingress has not been a problem whatsoever. & this hub has been ridden straight through the middle of lakesized puddles, torrential Mancunian downpours and freezing snowy mornings.

The shifting is even and smooth. It is much easier to change down a gear than it is up. That's not to say it's difficult to change up gear, it's just extremely easy to change downwards. You can literally flick the hub right down the gears with one finger, even when under a mild pedalling load, which is a joy when you need to quickly lower the gearing on the go (Something you would struggle to do on a derailuer). The grip shifter is a decent piece of kit, but the plastic screen is quite susceptible to being scratched when you have the bike upside down (such as when fixing a puncture on the street). 

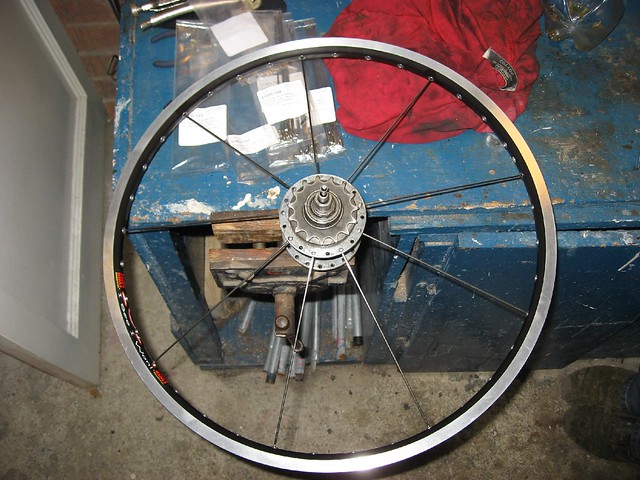
A huge bonus of hub gears is that they are very easy and simple to adjust and once adjusted they are much less likely to need anymore attention - unlike a derailuer gear setup. The Nexus takes this a step further, as there are yellow alignment markers on both the top and bottom of the hub. With the hub in 4th gear, when these markers are aligned - then it's adjusted correctly. That's it, job done. This makes the Nexus even easier to adjust than a Sturmey Archer, which can require a bit of trial and error to get it adjusted correctly.

For the first few months I was riding the hub whilst using SPD clipless pedals, it works just as well in this setup as it does with flat pedals. When Shifting you just have to ease off the pedalling more when using SPDs than you do without.

So in conclusion of this rather ramshackle review here's a few of my main pro's:
  • One gear shifter
  • Extremely easy adjustment (almost fit & forget)
  • Allows the use of a Hebie Chainglider
  • Totally sealed and virtually silent gears
  • Wide 306% range of gears is more than enough for anything I've needed (there are some big hills around here)
I'm not going to do a list of con's because there really aren't any when you compare it to the alternatives. OK if you want absolute lightness to gear range ratio than a derailuer is better, but this hub is not for racing, it is for town and commuting bikes which need reliability, minimum maintenance and a decent gear range for a decent price. Of all those aspects I don't think there is much else that can beat it. Obviously a Rohloff or other examples are better in their own respects, but factor in the price and a Nexus 8 takes the prize for me on my commute. I'm not saying I wouldnt' want a Rohloff, a Nuvinci, a Sturmey 8, or Sram - I'd love to have them all ;-) but a Nexus 8 is what I've got and I'm very pleased with it.

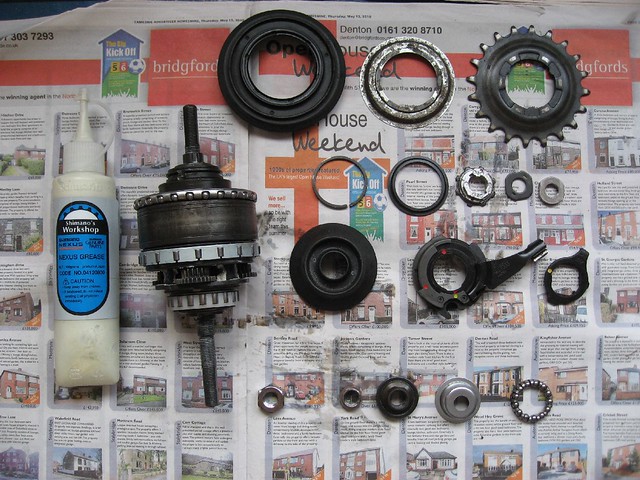
Now onto the regreasing. Last week I came across this excellent post by The Golden Wrench & whilst my hub felt fine and was still running as nice as the day I first got it I decided there was no harm in finally opening it up for the first time and regreasing the outer bearings as a purely preventative bit of maintenance.

Before you start this, bear in mind that although I know a little more than your average joe about hub gears, I'm not a qualified bike mechanic and I'm happily making this up as I go along. - take apart your expensive shimano hub gear at your own risk - not on my guidance ;-)
So lets get started:
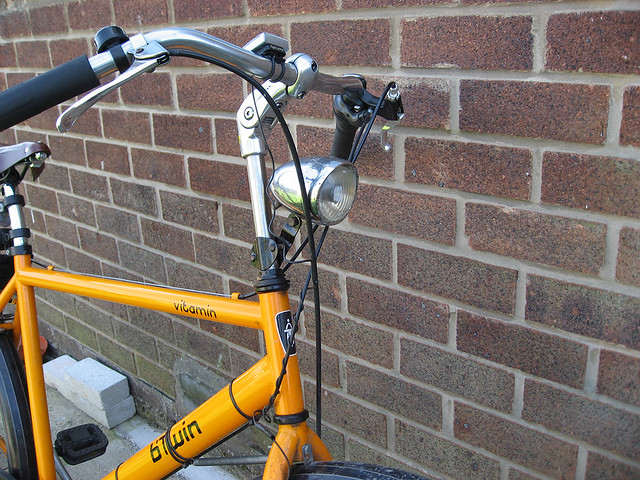
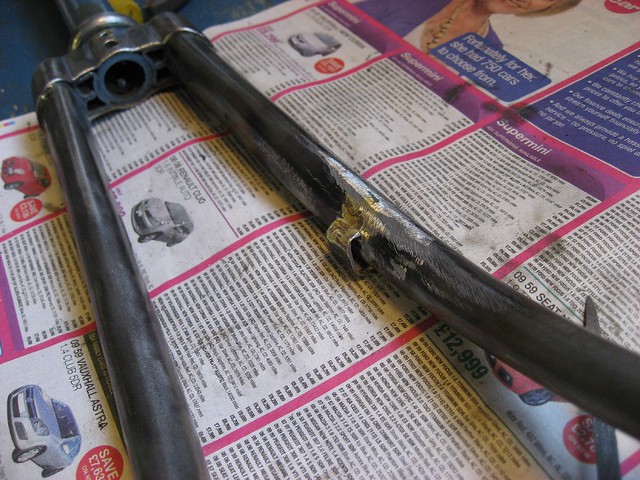
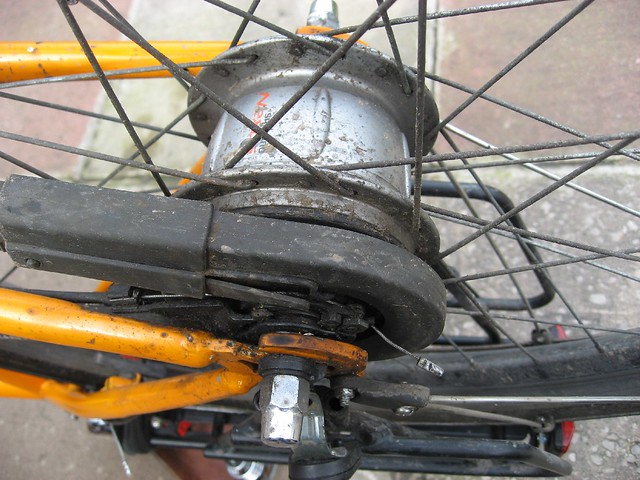
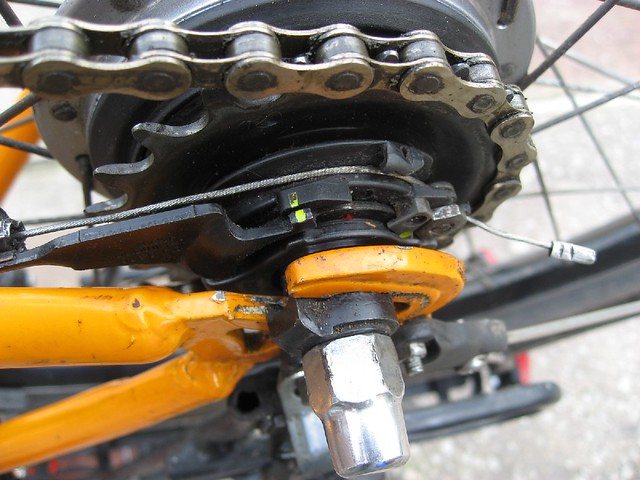
The hub still in the frame. It's covered in road dirt and I need to remove my Hebie Chainglider in order to remove the wheel.
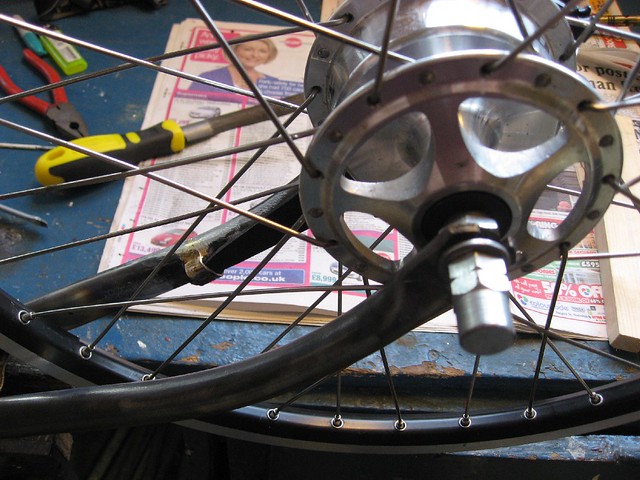
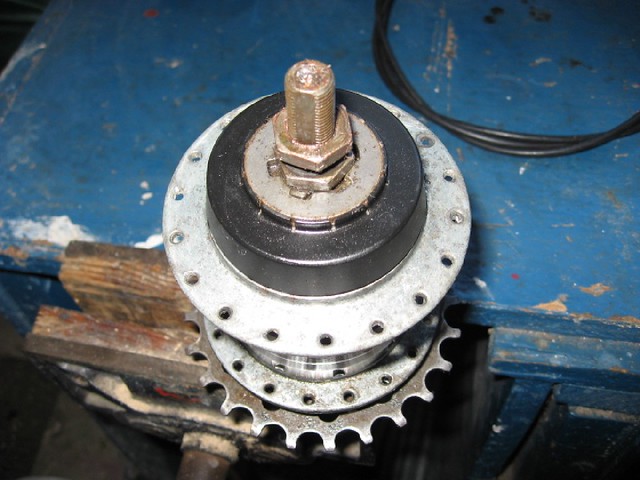
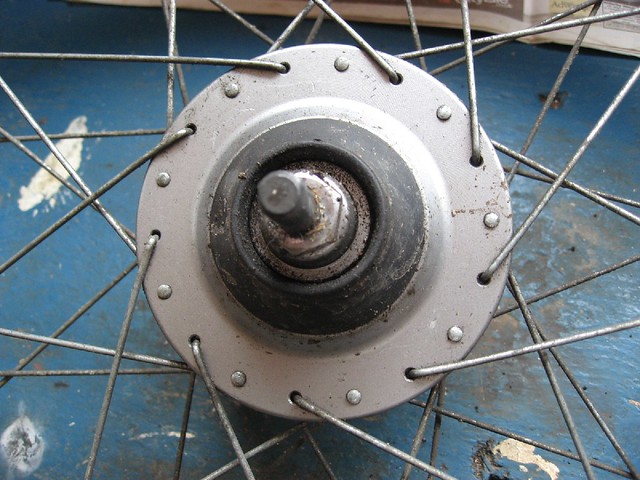
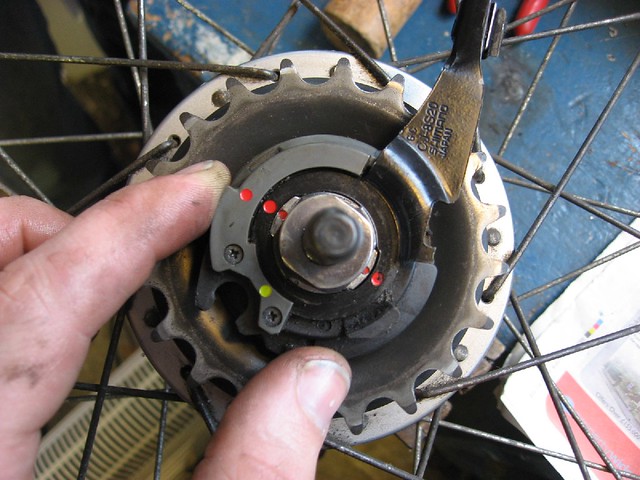
This is the outer gear changing mechanism. It removes very easily by twisting the lock ring in the opposite direction to the arrow (which lines up the yellow dots)
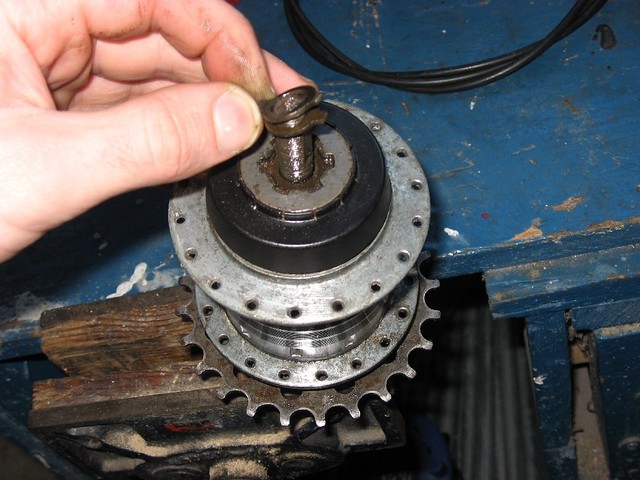
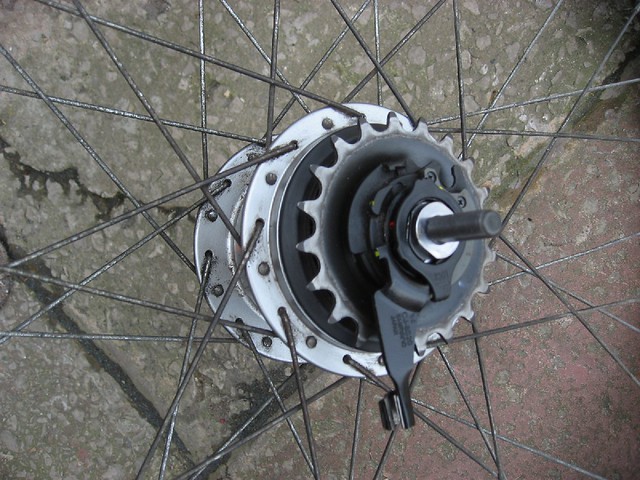
With the mechanism removed, you reveal a locknut, some more gear changer parts and the clip for holding the sprocket in place. There is a little plastic ring cap which just prises off (that's what I'm holding)
With the sprocket removed, you can see how dirty it is behind. This is no problem and even after I've cleaned it this grime will build up again after a bit of use.
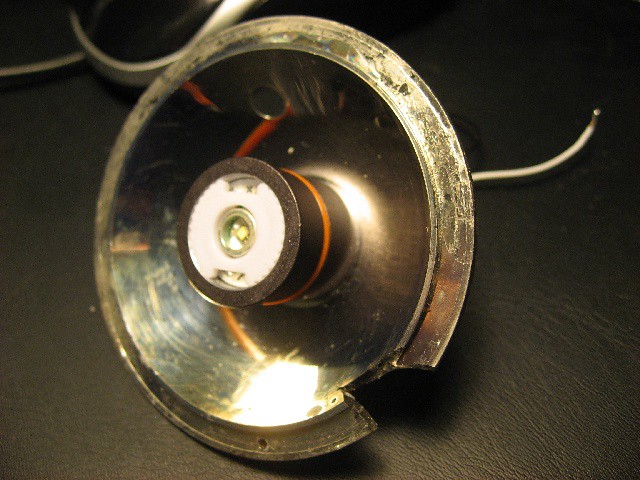
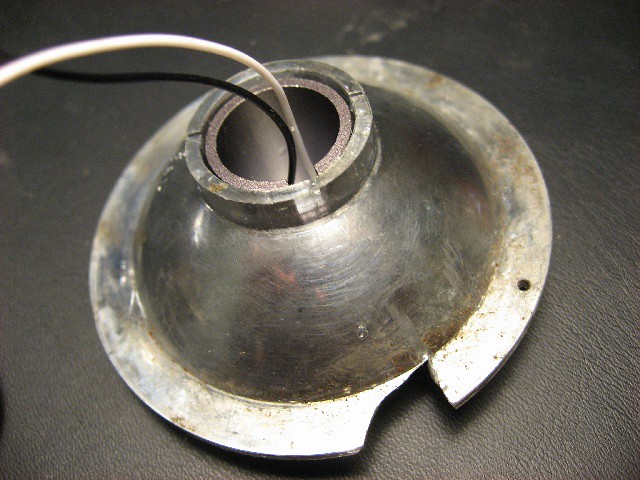
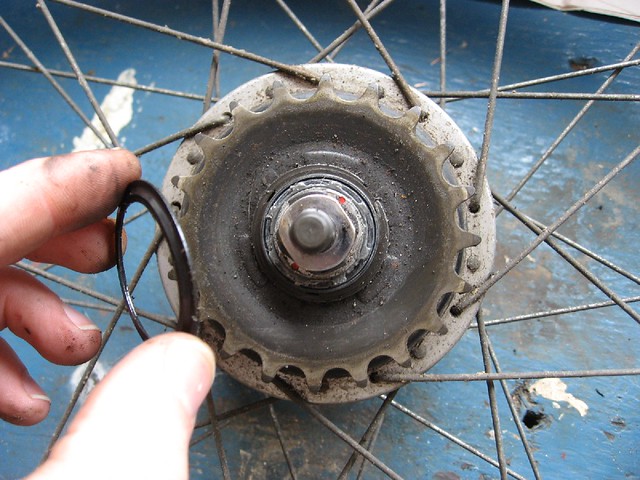
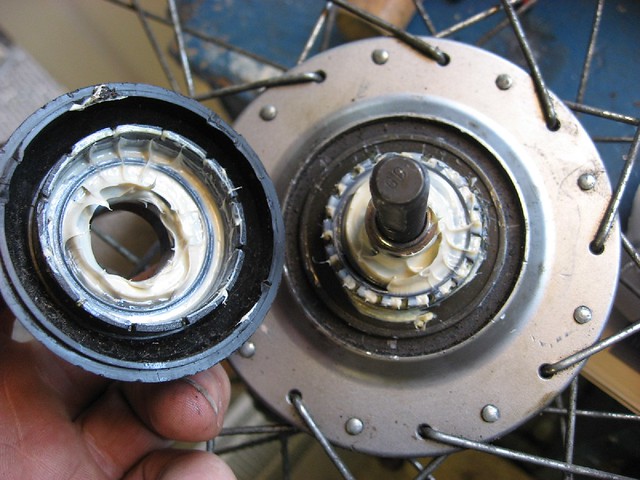
Flip the hub over and we have the plastic cover which protects the rollerbrake attachment. Remove the big nut and prise off the plastic cover along with the aluminium cone.
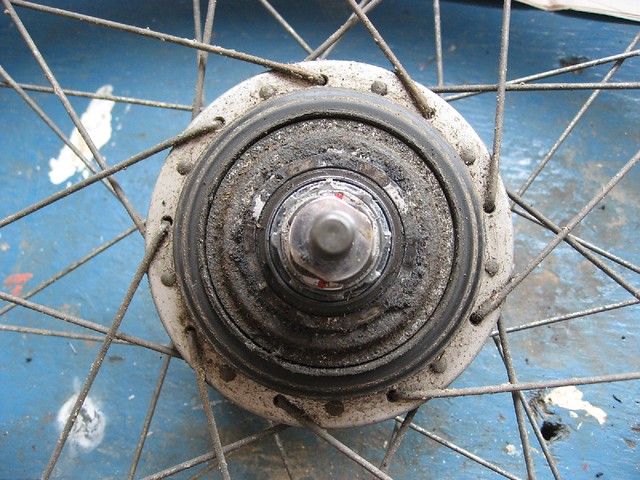
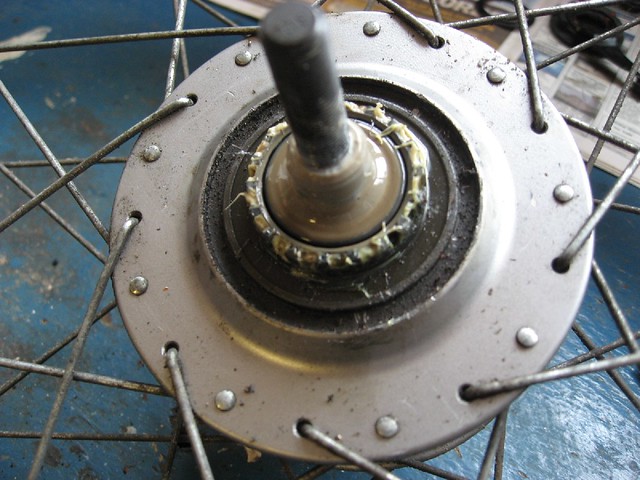
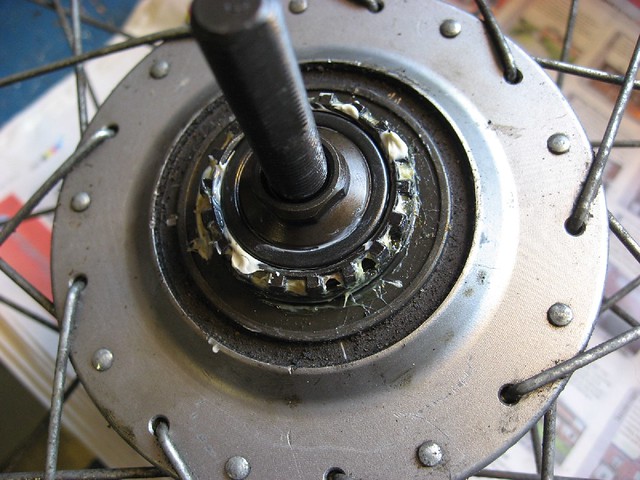
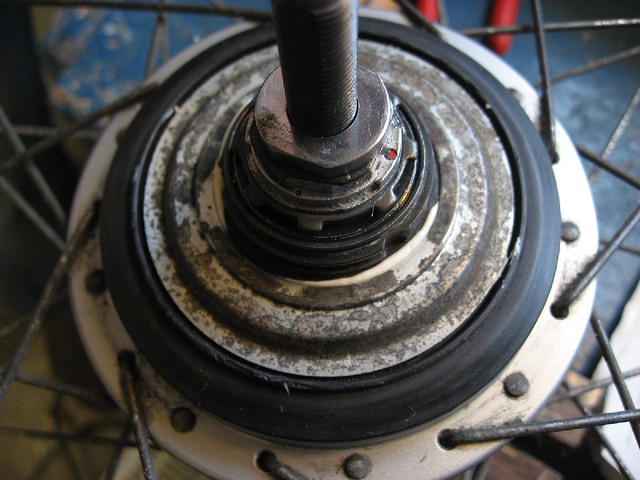
Underneath we find the rollerbrake attachment and the top of the bearing cone. This grease had mixed with water a little, but this is outside of the hub. Some time around this point I gave the wheel and the outside of the hub a bit of a clean to remove any loose crap. I'm not totally relubricating the hub here, so I don't want any loose crap getting inside the depth of the gears by accident.
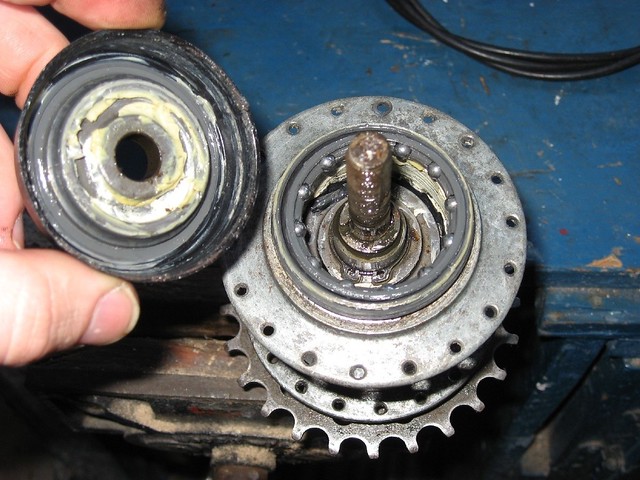
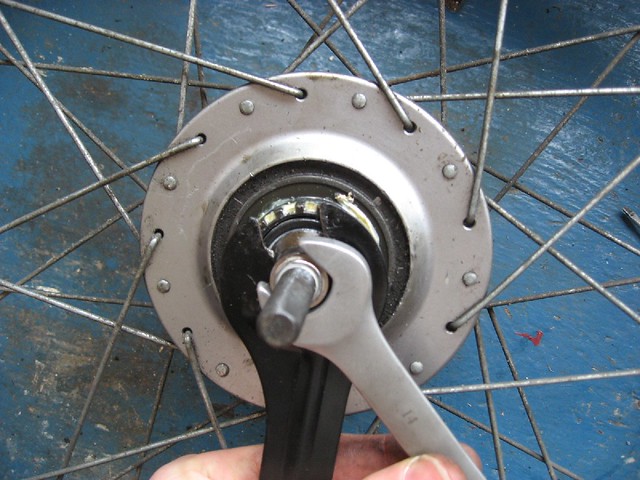
Undo the two nuts to free the hub internals from the shell. It took a bit of a firm tap to free the internals from the hub shell - proof of how well sealed the rubber seal was on the otherside.
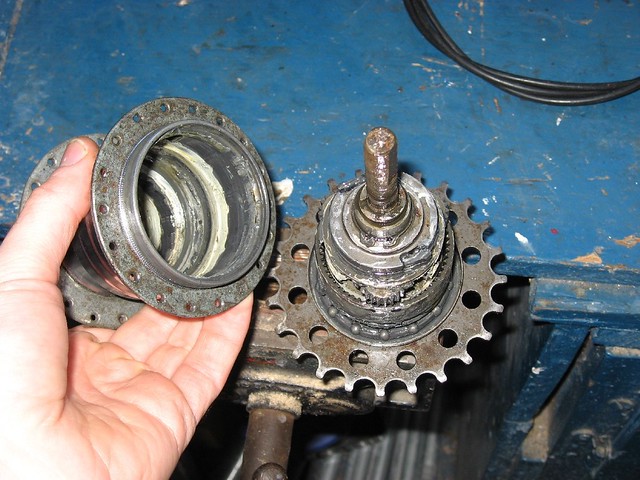
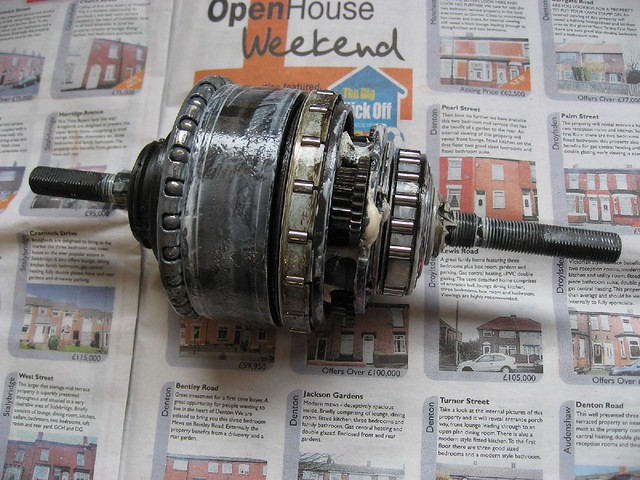
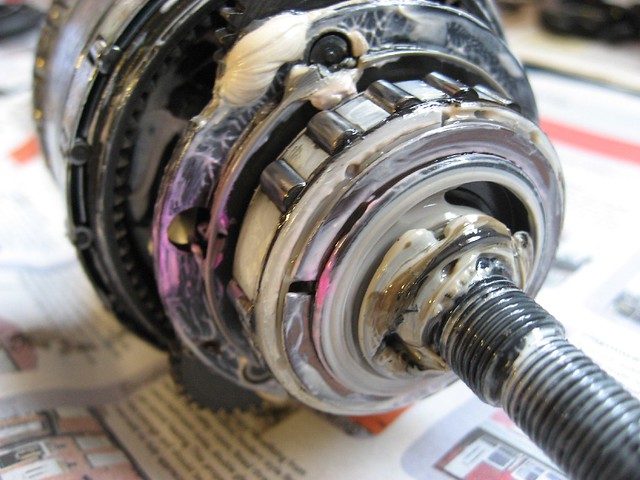
Here is the internals straight from inside the hub shell. Everything was still well coated in grease, albeit a little sparingly. No signs of corrosion or ingress at all.
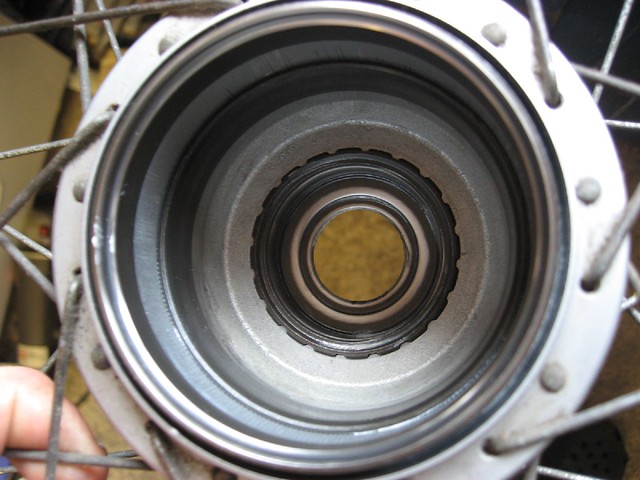
The inside of the hub shell looks like it has just come from the factory.
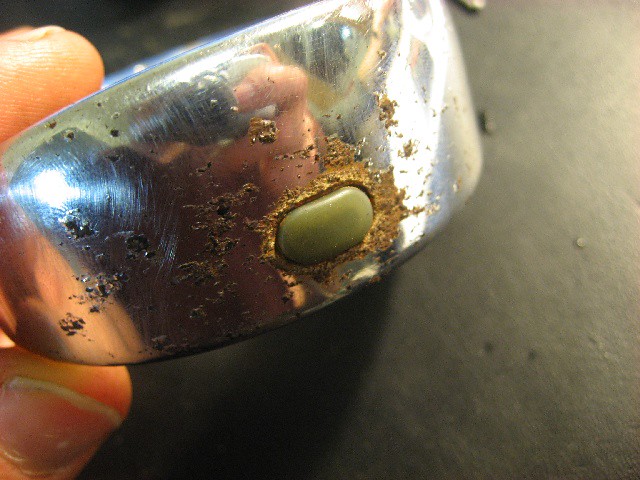
Presumably the pink spots of grease are something from the factory process. Or maybe a marker for Shimano to tell whether or not the hub has been DIY'ed by someone like me. There is a gap in the needle bearings here - No idea why.
I cleaned off the outside grease and removed a bit from these built up areas inside which had collected some dirt.
The grease all wiped off. As you can see the hub is still in great condition.
Inside the shell after giving it a wipe.
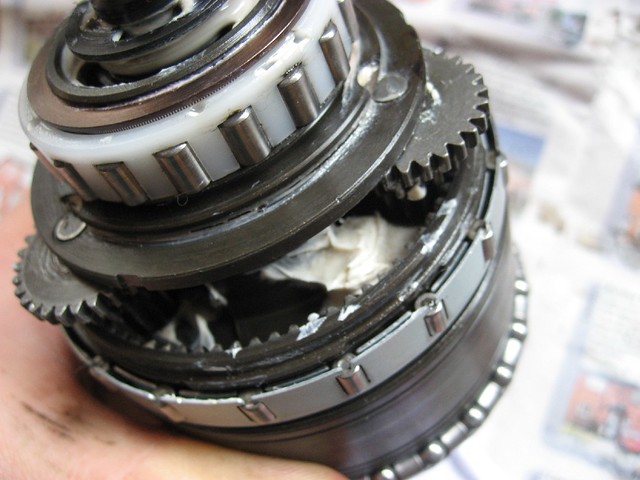
This is as far as the disassembly got.
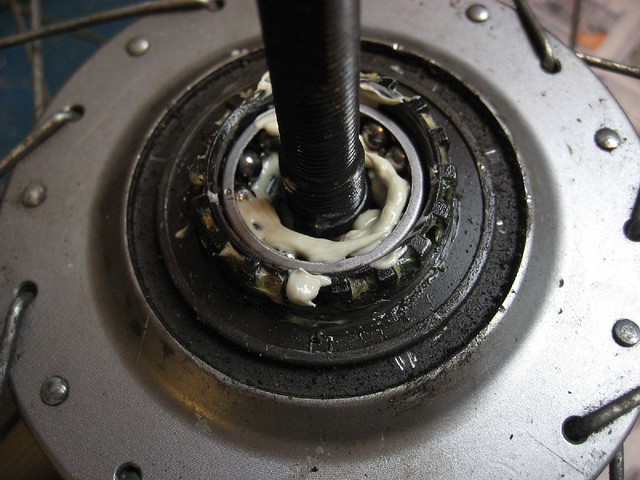
All the bearings got a thorough coating in Shimano's internal hub grease. I followed the example on Golden Wrenches post of how much to put on, but I think this was probably a bit over the top. Better than too little though, I guess.

**UPDATE**: After a few weeks I decided that my gut feeling had been right and that this was too much grease afterall. The hub just felt a bit too draggy in 7/8th gear and wasnt freewheeling as well as it had previously. so I took the internals out again and removed around 2/3rd of the grease. everything then felt alot easier on the legs when cruising at higher speeds.

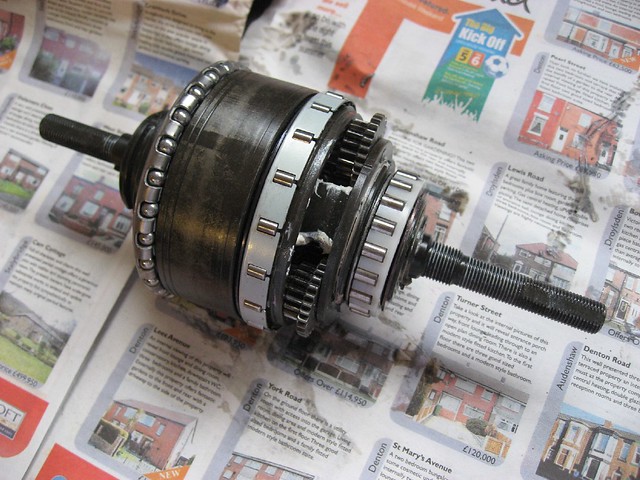
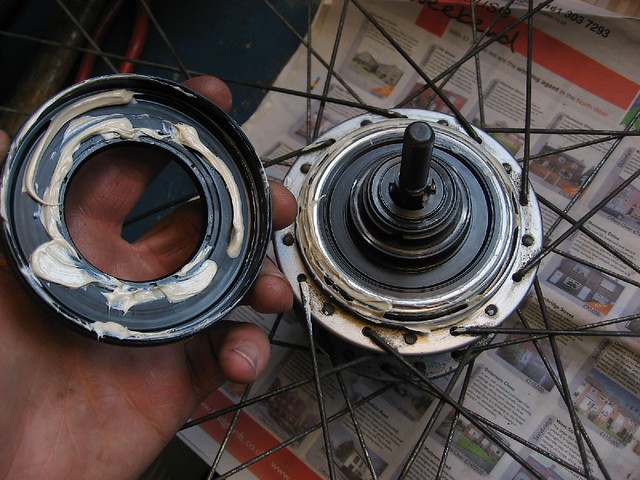
After putting the internals back in and turning them a couple of times I took it back out and took this photo to show how quickly the grease spreads around to where it's needed.
There'll be lots of excess over the rubber seal ring. The tolerances in this hub are tiny, it's a joy to see after opening 1970's Sturmey Archers with massive gaps all over the place.
Flip the hub over and put the race back in (the correct way up - I always get this wrong - photos help) and grease it.
Put the bearing cone back on finger tight. This will lock the internals back in place. Helpfully this screws onto its own seperate thread and not the long axle thread as is the case on many other hubs - that saves a boring task of screwing it all the way back down.
Grease the back of the dust shield and stick in back on.
Grease the back of the 2nd metal dust shield and stick that on too. Then refit all the little parts of the gear changer mechanism and lock them in place with the retaining nut.
Then you can refit the sprocket and put the outer gear change mechanism back on by lining up the red dots. then lock this in place with the yellow dotted lock ring.
Flip the hub back over and grease up the inside of the rollerbrake attachment cover & stick it on.
Then do the same with the metal cover. Then lock these down with the big retaining nut.
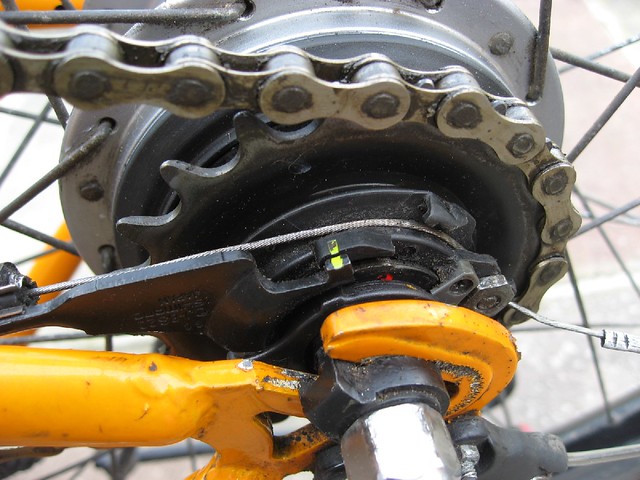
When it's all back together and back in the frame the hub was a tiny bit out of alignment - see the yellow lines don't quite line up.
A couple of twists on the handlebar adjuster and it was back in alignment.

With this done the gear change was immediately nicer and more solid feeling, even though it felt fine beforehand. The was a slight tick when freewheeling in the higher gears of 5-8 which are on a different clutch from gears 1-4, but this bedded in and disappeared after about 30 miles. Job done.