Showing posts with label Btwin. Show all posts

Friday, 3 December 2010

Obligatory snow ride post!

I took an extremely roundabout route to the poundshop yesterday, taking in some of the Fallowfield Loop, Debdale Park and then exploring up King's Road which is a rough track which cuts through the Fairfield & Denton Golf clubs.

The compacted snow of the Loop is lovely to ride on, plenty of grip, just needs a little more concentration than normal.
Looking back up the Loop towards Reddish
 The ride gave me chance to test a Sachs drum braked front wheel I got off ebay. A bit squeaky til it was bedded back in (I don't think it's been used for a while) but nice and powerful feeling.
Drum brakes need to be used with caliper style brake levers not V-brake levers* so I fitted an old Sturmey Archer lever.
 I stopped at one of the bridges in Gorton and noticed a lad on his BMX contending with a double Whitevanman overtake. Good job it's a 20mph zone eh!?, shame that most 20 zones are still open to through traffic- i.e rat runs.

The Loop connects up nicely with Debdale Park and the reservoirs
This is King's Road (although it looks the same as anywhere else in the snow!). It connects Hyde road with Audenshaw and the only thing stopping it from being a busy road full of traffic is the terrible surface. I'm guessing it is unadopted, possibly owned by the golf club and its kept intentionally rough to to keep it empty. The surface is much smoother with a layer of compacted snow on top.


*See the comments - I may or may not be talking sillystuff - do whichever works for you!.

Saturday, 27 November 2010

Brooks B67


The majority of the things I own are decent second hand items, but occasionally when I do buy something brand new I like it to be well worth it. You can’t get much more worth it than an iconic piece of British handmade craftsmanship. Ok I’ve still been stingy in a way, as I could’ve gone for one of the copper hand-hammered specials, but a plain steel riveted Brooks is still a beautiful thing.

I’d been riding the Nexus with my dad’s old B17 for a few weeks, but after installing the swept back bars this bike needed something nice and wide with springs on it (both from an aesthetic and functional point of view). The way up was between a Champion Flyer or a B67. The Champion flyer is a sprung version of the B17 for touring, whereas the B67 is a wider shorter city bike saddle. In the end I went for the B67 because I figured I already have a B17 so it would be best to try something different.


I've never needed to break a saddle in before....and I still don't because it's perfectly comfortable right from the get go.so I'm not too sure about all this breaking-in stuff I think maybe it’s not the saddle, it’s your arse and your seating position. My backside is already well used to cycling, so all it takes is a few miles of cycling with an allen key and a spanner. A few stops to do some adjustments and after 2 or 3 stops the saddle is in just about the right place and hey presto I’ve got a wonderfully comfortable saddle straight out of the box. Over the course of a few weeks it should start to mould to my sit-bones, but the important thing is to have it in just the right position in the first place.


The springs needed a tiny drop of oil at either end to stop them squeaking, but other than that everything is perfect.
I have secure parking at work (back of the office), so spending good money on a good saddle makes sense, but to be honest I would be thinking twice & stick to something cheap and undesirable if I was having to lock the bike up in public all day.

Heres a good video about Brooks. I especially like the machine that makes the springs and the wobbly set-off at 2:40 - something tells me he turns the key in his Mercedes more often than he sets off on his bike.


Tuesday, 12 October 2010

Hebie Chainglider (Nexus Part 7)

I've owned a Hebie chainglider for a few weeks now, but have only just managed to fit it last weekend.  Now it's on, it's amazing, but getting the thing fitted has been a complete pain in the arse.

First of all SJS Cycles (and many other stockists) sell the chainglider in two formats. One size fits 38 tooth chainrings, the other is supposed to fit both 42 & 44 tooth chainrings, which is the one I bought. Except this product fitting onto a 44 tooth ring is just a lie. It simply doesnt fit and I suspect the people out there that complain of excessive drag from a chainglider have been duped by this same situation and have forced their chainglider onto a chainring that is too big for it.

It took me a while to decide that it's not me going crazy or being simple and not understanding how it's supposed to fit, but that it simply doesn't fit anything other than a 42.

It's not Hebie's fault, looking closer at their website, the chainglider fits only distinct seperate rings and they don't state otherwise.There is no version that fits both 42 & 44. The one I got had 350 42 stamped on the back -i'ts been designed for a 42 tooth ring - nothing else. Who knows why the stockists they sell it as anything else. (except Velorution who seem to market it properly - I should've bought it from there)

So ok, nevermind. It just means I had to get a 42 tooth ring instead. So I ordered one from a seller on ebay and they sent me a chainring for a tandem!. So that went back for a refund and I got a Stronglight chainset from another seller instead. There are cheaper options available than a Stronglight, but they have the chainring bolted on, whereas the Stronglights are a lovely minimalist piece of kit that is certain to work inside the chainglider.

Here is the bike with 42 ring fitted and chainglider.
The next problem is that the chainglider is designed to fit a variety of sized frames and wheeled bikes. There is plenty of adjustment range on the back, but it was just too long to fit on my 26" wheel bike. So I had to chop some off.

I cut just enough off for it to work without fouling on the rear sprocket teeth.

Once that was done it was very straight forward and easy to fit, everything just clips into place. The plastic it's made from is pretty flexible soft feeling stuff, but it does feel solid and durable at the same time. Getting the inside section that covers the rear sprocket is a tiny bit tricky as it has to go behind the nexus hub gear cassette joint then the back section slides over and clicks into place on four little studs.

There is a demonstration video on the Hebie website to show you how to fit it. That shows the newest model, it has a fancier clipping system than mine which must have come from existing stock of the older design.

Here it is fully fitted.


I'm suprised just how silent and drag free it actually is (i.e. barely any difference from before). I gave the chain a good spray of chainlube before and after fitting. More than I would normally use on an open chain but certainly not a huge amount. Now the whole rigmoral is over I'd definately recommended the chainglider to anyone wanting to fully enclose their chain. But I would say that you need to be prepared to do some of your own work. I'm sure in some cases you can just fit it straight out of the box, but I'd imagine that anything with 26" wheels will require a little chopping, as I've done.

There isn't much info available about the kinds of problems I've encountered with fitting the chainglider, just a few complaints from people who I would guess have tried fitting it to chainrings that are too large or have not done some trimming to make it fit the rear sprocket. So hopefully this post can help anyone thinking of getting a chainglider, because it really does seem like a decent piece of kit to me.

An added bonus is that the hub seems to be running nicer with a 42 chainring. 42/20 is exactly on the 2.1 ratio that Shimano recommend you keep as close to as possible and it's noticeable how the change either side of 4th has improved a bit.

**Small update after 3 months use**
The chainglider is still performing brilliantly through rain, sun & snow. It's there to be forgotten about and quietly gets on with its job. 

I had been giving the chain a quick spray of chainlube through the little hole on the top every so often until a few weeks back when I noticed the chainglider was skipping occasionally on the way home. After taking it off to have a look I could see the chain was pretty dry so I've come to the conclusion that whereas the spraylube it great on open chains it's not the right stuff for inside the chainglider.- Obvious in hindsight, but the spraylube had impressed me so much on my open chains that it was just the first thing I reached for when I put  the chainglider together.

If you think about it, one of the benefits of having the chain completely enclosed is that you can have it bathed in copious amounts of oil without worrying about it going all over your trousers. So I put it back together with plenty of oil on the chain and plenty on the inside of the glider's parts. Then rotated the cranks a few times whilst pouring yet more into the oiling port.

It's now running seriously smooth & I wish I'd just done this right from the start. There was a little bit of excess made its way out of the rear section the next day, but hardly any really.

All in all an excellent piece of kit that lets you just use the bike for everyday transport.

Thursday, 7 October 2010

Light Mount

Plastic mountings on bikes are crap. Lights, pumps, locks, whatever the item, the plastic mount that came with it will be a prime suspect for breaking prematurely at some point. And that's exactly what happened to the mount for my cheap ebay light (I seem to break expensive ones just as easily I should point out).

I hadn't liked it on the handlebars anyway. It's big and ugly but does throw out a huge amount of light and poundshop batteries last for yonks in it. So I decided to find somewhere else to diy mount it as a temporary fix whilst I um & ar about playing with cree lights of some sort.

A quick search in the bit & bobs tin found this:


It's probably some kind of reflector mount I've removed in the past, I'm not sure. A quick look at the front of the bike and it looks like the mudgaurd mount on the fork will be a good spot.
The bracket needed some bending and straightening to make it work. I got a bit overzealous with using a g-clamp to help straighten out the smaller kinks in the metal and this happened.......ok maybe it's not just plastic things I break easily.


I threw away the broken mount and drilled a hole in the bottom of the casing. Then mounted it on the bracket with a small bolt. This is the most important bit -I put a piece of innertube between the bracket and the light mount to dampen any vibrations. I did the same between the bracket and frame.


I know it's a bit rough and ready but it works and it's solid, plus it gets the light out of the way where you can forget about it until you need it. Maybe at some point I'll tidy up the bracket a bit with either a polish or a coat of black paint.


Thursday, 30 September 2010

Message to the guy who asked about the Nexus yesterday

To the guy with the ginger hair, beard and black dropbars in Manchester yesterday. Nice chatting to you. Sorry I didn’t get chance to direct you to this blog, hopefully you’ll come across it anyway. To answer your question, the Nexus hub is great. Very smooth, free running and almost totally silent. You have to learn a different style of shifting compared to a derailleur, but it’s very simple and actually more user-friendly (it helps to ease off slightly when upshifting and be wary of the change between 4th and 5th). The range of 307% is more than enough for commuting 20 miles a day.

Mine is the sg-8r31 model. The latest one available is sg-8r36. Nearly all of the complaints you might come across on the internet will be about the earlier models such as sg-8r20. I presume from the experience of my hub that shimano have ironed out the problems with the revised models. Presumably the very latest models and the premium redband model or Alfines are even better than mine.
 
I intend to do a proper review at some point in the future, but for now, based on ‘fit and forget’-ability so far I’d give it 9/10.

Saturday, 18 September 2010

Nexus Handlebars (Part 6)

This post is about the single best improvement I've made to a bicycle.

The vast majority of bikes available in the U.K. these days come with straight handlebars, or straight riser bars like the ones that came standard on the B’twin Vitamin (I'm ingoring dropbars as they are generally on a different kind of bike). Those are fine if you are going mountain biking on the Marin trail, but not so great if you are riding on the roads. Straight bars force you to lean forward on the bike, your centre of gravity is forward of your hips and you are taking a lot of your bodyweight through your wrists.

I had read a number of things about the benefits of an upright riding position, but a great post to read is this on Copenhagen Cyclechic which explains the benefits more eloquently that I ever could. After reading this last year I adjusted the position of the bars on my Trek to allow a more upright position and felt the benefit immediately. Equally it made me realize what it was that made the standard riding position of my M-bar Brompton so nice. However both of these bikes still left my hands in a straight position, 90 degrees away from the direction of travel. So on the Nexus I decided to do things properly and get a set of swept back handlebars like you would see on nearly every bike in Holland or Denmark. There are plenty of options out there and I had been eyeing up a set of North road bars from SJScycles until I found that Decathlon sell a standard set of swept back City Bars for £8.99.

Here are the new swept bars in a side by side comparison with the existing riser bars. You can see from this how much these bars alter your grip position. What isn’t clear from the photo is how much more freedom to refine the position is available with swept bars. With straight bars you are basically stuck with one fitting position, but the swept bars mean you can alter the angle of them ( or even flip them over) on the stem clamp and in turn quite dramatically alter the riding positions available to you. This brings up yet another drawback of the majority of bicycles available in the U.K. Many now come with a threadless stem, which offers far less adjustability than a quill stem or even an adjustable quill stem like is fitted to my Trek.

I knew from my own experience and reading that the swept bars would be an improvement, but wasn’t expecting the sheer difference it made to the experience of my commute. The Nexus is a much much faster bike with swept bars fitted, so much so that I found myself cruising in 8th gear quite easily even with the new higher gearing. The bike is more comfortable and my overall feeling of subjective safety is greatly improved by having my head raised higher and upright, giving a wider view of the road and better shoulder checking. Bumps and potholes are also much less jarring, as there is less weight over the front wheel and less impact coming through the wrists.


Here is another good post on the benefits of riding upright from Sheffield Cycle Chic which catches upon the fact that many cyclists subconciously want to sit upright on their bikes. Everyone wants a cool looking bike, be it with dropbars or straight, but if they could only see themselves cycling, they might notice that their own bodies are telling them to sit upright. The problem is their bikes don't let them.

Even now the riding position on this bike is not as upright as it could be, mainly because of the stem. So there is always the option for putting a taller shorter reach stem on as well.


Tuesday, 14 September 2010

Nexus Gearing (Part 5)

As standard the B'twin Vitamin came with a 36 tooth front chainring. the Nexus hub I got off ebay had a 20 tooth sprocket fitted. Using Sheldon Brown's Internal Hub Gear Calculator I can see that this gave the bike a gain ratio range of 1.8 - 5.6 (or 24.4 -74.9 in gear inches) which felt too low for my legs, but good enough to put up with for the time being.

I had planned to fit a smaller rear sprocket to the Nexus hub inorder to raise the gearing. But there is a problem with the shimano gear shifting design that isn't apparent in other mechanisms such as the Sturmey Archer style shifter toggle. The Shimano system rotates around the axle and takes up quite a bit of room, this means that there is a minimum sprocket size that can be accomodated on the hub before you start getting issues with the chain fouling the shifter mechanism. The range of gears I wanted needed a 14 tooth sprocket, but the minimum size the hub can safely accomodate is 16 teeth.

So since that was a dead end I bought a new longer 1/8" chain and fitted an old 44 tooth front chain ring I had left over from when I raised the gearing on the Brompton.

Shimano recommend that you keep the gearing as close to a 2:1 ratio as possible. This is to do with the amount of torque being transferred through the hub and I won't pretend to understand it. But basically 44 divided by 20 equals 2:2 which is closer than some of the acceptable ratio examples that Shimano give in the Service Instructions so it will do just fine for me.

On square tapered cotterless cranks you'll find a bolt under a cap on the chainring like this:

Usually a normal wrench socket will be too thick to fit in here and undo this bolt, so you'll need a tool like this one that has very thin clearance allowing you to undo the bolt.

Once that's out you'll need yet another special tool called a crank puller. This screws into the crank and chain ring and allows you to use either an allen key or spanner to pull the crank away from the sqaure tapered axle.

With the old chainring removed you can fit the new one, making sure its on straight and also opposing the other crank arm at 180 degrees. Then use the bolt you removed earlier to tighten it onto the axle.

This bigger chainring means the chain has to be extended. I choose to simply add a few more links to the existing chain rather than fit an entire new chain. I test fitted the chain to see roughly how many new links were needed.

Then spliced in the new links. Mounting the chain splitter in a vice can make things alot easier.

And finally the finished upgrade.

I had planned to flog the 36T chainring on ebay but in clumsily removing the pedals I managed to break the plastic guard. This is why the blog is subtitled 'making, breaking and riding bikes in manchester' because if something is flimsy enough to be broken easily, I will inevitably break it at some point!.

The crank arms don't match anymore, but that doesn't matter, at least I've made use of something that was just sitting in a draw.

This set up now gives me a range of 2.2 - 6.8 (or 29.9 - 91.5 gear inches) which is just about right for setting off in 3rd and running up through the gears and cruising in around 6th or 7th. That leaves 1st and 2nd for going up steep hills and 8th for coming down them!.

Coincidentally 20T - 44T is also the right size for a Hebie Chainglider to fit....hmmmm.....

Sunday, 5 September 2010

Nexus – bits & bobs (pt 4)

I used the Trek to go pick up a rather oversized parcel from the post office.

Contained in the monster box was a modestly sized zefal rack (£9.99) and a set of shimano spds (these were for using on the marin trail) and a whole massive load of shredded paper. I’m guessing either SJS cycles had run out of medium sized boxes or needed an excuse to get rid of some paperwork.

The rack went onto the Nexus pretty easily. It’s a bit of a fiddle to get everything lining up nicely and kit itself doesn’t come with all the fixing bolts you’ll need. Presumably because different bikes use different sized threads for the mounting points (they are bottle cage screws/bolts). i.e. the threads on the Nexus vitamin are the same as on my old Raleigh, but the threads on all the various mounting points on the Trek are not the same. For me it wasn’t a problem as I could swipe bolts from the Raleigh to make up the numbers, but for other folks it might take another frustrating trip to the shop.

Unfortunately  Zefal don't seem to have designed it with my Ortlieb Classic panniers in mind. There is no suitable place for the bottom hook to hold onto the frame properly. However with a bungee held in the right place that gives a decent place to hook the pannier to and is just as sturdy as if there had been a spot on the actual frame.There's the old adage 'you get what you pay for' and for moment the pannier problem made me regret going for the cheapest rack I could find, but that moment passed and I realised for £9.99 this rack is light, easy(ish) to fit and does the jobwell.
(although its not as pretty as this one).

With the rack fitted it meant the Nexus is now finally ready for some regular commuting, but when I was finished with the spds on the Marin trail I swapped them onto the Nexus to finish the job.

The gearing is still too low on this bike, so that’ll be the subject of part 5.


Friday, 20 August 2010

Nexus 8 Shifter (part 3)

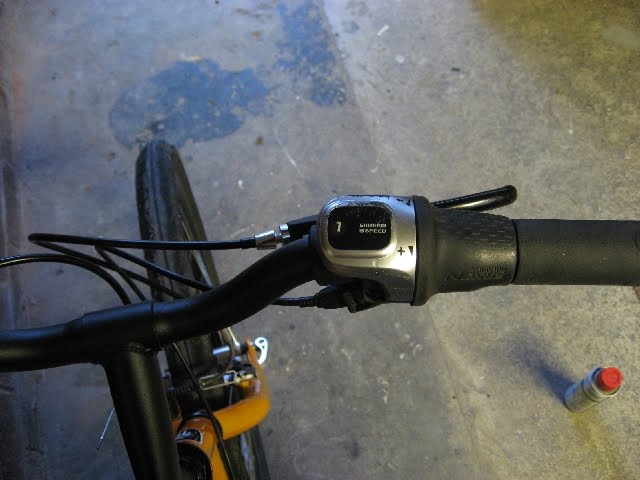
I've been having a bit of an issue with the Nexus 8 shifter. Basically it shifts in a different direction to the one I'm used to. The gripshift on my Trek is twist backwards to go down gears and twist upwards to go up gears. I think this is the same on all gripshift systems, but I might be wrong. But for some reason the shifter for the Nexus system goes in the opposite direction. It shifts in the same way as a motorbike accelerator, you twist backwards for faster.


This is fine if your only gripshift is the Nexus, but I use both bikes and its really confusing to ride the Nexus then get on the Trek and start changing down gears when I meant to change up and vice versa.


So the only easy solution I could see was to swap the Nexus shifter from the right hand side of the bars to the left. This would mean the number dial would be upside down, but I can live with that if it saves me from getting the gears all wrong when I'm in the middle of traffic.

The shifter is also a bit of a handlebar hog and had meant my brake levers were not symmetrical, so whilst I was at it I decided to solve this by chopping a bit off one of the grips.

I made sure I had enough of the grip leftover to accomodate the width of my hand, since the shifter wouldn't be comfortable to use as part of the grip for long trips.


I'm toying with the idea of some swept back handlebars on this bike, so this might all get redone at some point anyway.

Wednesday, 21 July 2010

Nexus Mudguards (pt 2)

I got the Mudguards today after a visit to the local royal mail depot, where they have a nice collection of Mailstars parked up*

Nice and shiny with some go-faster stripes.
They didnt come with the various fitting bolts I would need since they were a cheapo (ish) set off ebay. But I knew the tin of bit'n'bobs in the garage would easily solve that issue.

Fitting mudguards is easy and they weigh barely nothing. So it amazes me sometimes when I see people cycling along in the wet, sending a huge splatter of mucky road water all over themselves and anyone behind them. Seems to me its yet another symptom of how cycling is viewed in this country compared to say Holland or Denmark - i.e. over there most biycles with come with mudguards already fitted.

This being a big fat 65mm wide set of mudguards means that a set for skinny tyres must weigh less than nothing.

The only tricky bit was getting the line of the circumference of the guards to match the tyres closely. the stay are adjustable to help you do this, but there was still a huge gap between guard and tyre down near the bottom bracket. So I hacksawed a little aluminium spacer in half to give a slightly better profile.


Done!


*Mailstars are under threat of extinction if the previous head of Royal Mail gets his way as I found out from posts on Manchester cycling.

Tuesday, 20 July 2010

Nexus 8 Build (part 1)

I'd been thinking of building up a hub gear bike for the everyday commute for a while, when I came across the bargain singlespeeds they are selling at Decathlon.

£69.99 sounded to good to be true, but after a quick inspection and ride up the aisle its easy to see that, for the money, its suprisingly decent piece of kit.

Heres the basic bike, it's a B'twin Vitamin in a lovely bright orange! (ignore the floppy chain, I'd already started the build when I took the photo)


So the plan was, get the bike then scout out ebay for potential hubs. Plenty of choices available. 3 speed Sturmey Archers?, 5 speed sachs?, nexus 7 or 8 speeds among others. Initially I thought it would make a good project to try and do my first wheelbuild, but when a full 26" wheelset with a Shimano Nexus 8 speed & tyres came up and decided wheelbuilding would have to wait for another day.

Here's the wheelset:
They came with a 20 tooth sprocket, twistshifter and decent Schwalbe City Jet tyres.


Now the 20 tooth rear sprocket combined with the 36 tooth chainring already on the Vitamin would give me gear inches of approx 24-75, which is fine, but not quite high enough for what I think I would like. So a smaller rear sprocket will be getting bought later on.

The Vitamin came with a an 18 tooth bmx style freewheel on the rear, meaning I would have to extend the chain by a couple of links. Luckily I an sram pc-1 leftover from when I changed the chainring on my Brompton. The sram chain was even the correct length already.

Slotting the rear wheel in is pretty straight forward. These nexus hubs have a mechanism on the drive side which rotates centrally around the axle in order to change gear. As opposed to the in and out mechanism I'm used to seeing on Sturmey Archer hubs. This Shimano solution works very nicely though and and is easy to adjust as there are a full set of yellow and red markers which will all line up correctly when the Hub is in 4th gear (1:1 Direct Drive)

There are a variety of anti turn washers for these hubs, depending on what kind of dropouts your frame has. The idea of the Anti-turn washers is to align the shifting mechanism in the correct direction and keep the axle fixed in one direction. Mine has the traditional horizontal dropouts because it is built to be a single speed, which is perfect because it means less fuss for me and it makes is easy to adjust the chain tension. Virtually any older frame will be similar though. As usual with cycling, for more detail turn to Sheldon.


Here is the locknut that attaches to the shifter cable and slots into the mechanism on the side of the hub:


Once the rear wheel was in it was just a case of routing the cable down the chainstay arm and up the frame. Cable ties for that job. making sure the cable routed away from the chainring, just in case.

Another beauty of hub gears.....only one shifter to worry about. Easy to mount on after moving the brake lever a bit to give enough room for the grip to go back on ( I might swap the grips later on as they feel a bit gummy for my liking)


Here's the job done. Simple. when I orginally bought the wheelset I had been thinking I would swap the tyres for some dependable Schwable Marathons, but after seeing it complete I really like the extra chunk that the 1.95 city jets give, so I'll be keeping them for now.


Just waiting for some black mudgaurds to come in the post and it will be ready for all weathers.