Showing posts with label decathlon. Show all posts

Friday, 11 February 2011

Nexus 8 - Laying back (Part 9)

Forenote: If you are a framebuilder, or frame connoisseur of somesort - look away now!.

I originally bought an extra long adjustable stem off ebay for fitting to the Hopper. But whilst it was sitting around waiting I thought I'd see what it would be like on the Nexus. The result was a bit of fun, but not really rideable on a daily basis on busy roads. The main problem being that the higher handlebars aren't compatible with the seat tube angle. It creates a strange kind of feeling where you feel like you are pedalling behind yourself. 

The solution (as Mr.C pointed out would be the case) is a slacker seat tube angle. i.e to have the saddle further back from the pedals. But thats not going to happen without starting over again with a vintage frame, or just buying a Dutch bike of some sort. The other option is a layback seat post. 

So £8 found it's way to an ebay seller and and I was the proud owner of a 'new old stock' 25.4mm layback seatpost to continue my Frankenbike Experiment.

The original seat tube angle on the frame is approximately 75.5 degrees. With the layback post the effective seat tube angle goes down to 70 and in the process makes the much taller handlebars viable.  The head tube angle was already around 70 degrees, so effectively the two angles are now parallel

This was originally just an experiment to see how it turned out, but it's so much nicer to ride that I knew I'd be keeping it setup like this after the first day's riding.

I'm under no illusions that this equates to the geometry of a classic Dutch bike, but it gives a nice mixture of the angles - which seems to work for giving that relaxed riding position but respecting the crappy vehicular context in which it's going to get ridden most days of the week.

Here's a little before and after animation, then a couple of random pics to illustrate seat angles because it's difficult to see what's going on without seeing the angles measured.


This is an aluminium Gazelle Touche, which measures at the same 70/70 that my bike is now roughly equivalent to.


Apologies to Amsterdammers for stealing & graffitiing their pictures. I'll make up for it one day by buying a bike of you.

Tuesday, 12 October 2010

Hebie Chainglider (Nexus Part 7)

I've owned a Hebie chainglider for a few weeks now, but have only just managed to fit it last weekend.  Now it's on, it's amazing, but getting the thing fitted has been a complete pain in the arse.

First of all SJS Cycles (and many other stockists) sell the chainglider in two formats. One size fits 38 tooth chainrings, the other is supposed to fit both 42 & 44 tooth chainrings, which is the one I bought. Except this product fitting onto a 44 tooth ring is just a lie. It simply doesnt fit and I suspect the people out there that complain of excessive drag from a chainglider have been duped by this same situation and have forced their chainglider onto a chainring that is too big for it.

It took me a while to decide that it's not me going crazy or being simple and not understanding how it's supposed to fit, but that it simply doesn't fit anything other than a 42.

It's not Hebie's fault, looking closer at their website, the chainglider fits only distinct seperate rings and they don't state otherwise.There is no version that fits both 42 & 44. The one I got had 350 42 stamped on the back -i'ts been designed for a 42 tooth ring - nothing else. Who knows why the stockists they sell it as anything else. (except Velorution who seem to market it properly - I should've bought it from there)

So ok, nevermind. It just means I had to get a 42 tooth ring instead. So I ordered one from a seller on ebay and they sent me a chainring for a tandem!. So that went back for a refund and I got a Stronglight chainset from another seller instead. There are cheaper options available than a Stronglight, but they have the chainring bolted on, whereas the Stronglights are a lovely minimalist piece of kit that is certain to work inside the chainglider.

Here is the bike with 42 ring fitted and chainglider.
The next problem is that the chainglider is designed to fit a variety of sized frames and wheeled bikes. There is plenty of adjustment range on the back, but it was just too long to fit on my 26" wheel bike. So I had to chop some off.

I cut just enough off for it to work without fouling on the rear sprocket teeth.

Once that was done it was very straight forward and easy to fit, everything just clips into place. The plastic it's made from is pretty flexible soft feeling stuff, but it does feel solid and durable at the same time. Getting the inside section that covers the rear sprocket is a tiny bit tricky as it has to go behind the nexus hub gear cassette joint then the back section slides over and clicks into place on four little studs.

There is a demonstration video on the Hebie website to show you how to fit it. That shows the newest model, it has a fancier clipping system than mine which must have come from existing stock of the older design.

Here it is fully fitted.


I'm suprised just how silent and drag free it actually is (i.e. barely any difference from before). I gave the chain a good spray of chainlube before and after fitting. More than I would normally use on an open chain but certainly not a huge amount. Now the whole rigmoral is over I'd definately recommended the chainglider to anyone wanting to fully enclose their chain. But I would say that you need to be prepared to do some of your own work. I'm sure in some cases you can just fit it straight out of the box, but I'd imagine that anything with 26" wheels will require a little chopping, as I've done.

There isn't much info available about the kinds of problems I've encountered with fitting the chainglider, just a few complaints from people who I would guess have tried fitting it to chainrings that are too large or have not done some trimming to make it fit the rear sprocket. So hopefully this post can help anyone thinking of getting a chainglider, because it really does seem like a decent piece of kit to me.

An added bonus is that the hub seems to be running nicer with a 42 chainring. 42/20 is exactly on the 2.1 ratio that Shimano recommend you keep as close to as possible and it's noticeable how the change either side of 4th has improved a bit.

**Small update after 3 months use**
The chainglider is still performing brilliantly through rain, sun & snow. It's there to be forgotten about and quietly gets on with its job. 

I had been giving the chain a quick spray of chainlube through the little hole on the top every so often until a few weeks back when I noticed the chainglider was skipping occasionally on the way home. After taking it off to have a look I could see the chain was pretty dry so I've come to the conclusion that whereas the spraylube it great on open chains it's not the right stuff for inside the chainglider.- Obvious in hindsight, but the spraylube had impressed me so much on my open chains that it was just the first thing I reached for when I put  the chainglider together.

If you think about it, one of the benefits of having the chain completely enclosed is that you can have it bathed in copious amounts of oil without worrying about it going all over your trousers. So I put it back together with plenty of oil on the chain and plenty on the inside of the glider's parts. Then rotated the cranks a few times whilst pouring yet more into the oiling port.

It's now running seriously smooth & I wish I'd just done this right from the start. There was a little bit of excess made its way out of the rear section the next day, but hardly any really.

All in all an excellent piece of kit that lets you just use the bike for everyday transport.

Thursday, 30 September 2010

Message to the guy who asked about the Nexus yesterday

To the guy with the ginger hair, beard and black dropbars in Manchester yesterday. Nice chatting to you. Sorry I didn’t get chance to direct you to this blog, hopefully you’ll come across it anyway. To answer your question, the Nexus hub is great. Very smooth, free running and almost totally silent. You have to learn a different style of shifting compared to a derailleur, but it’s very simple and actually more user-friendly (it helps to ease off slightly when upshifting and be wary of the change between 4th and 5th). The range of 307% is more than enough for commuting 20 miles a day.

Mine is the sg-8r31 model. The latest one available is sg-8r36. Nearly all of the complaints you might come across on the internet will be about the earlier models such as sg-8r20. I presume from the experience of my hub that shimano have ironed out the problems with the revised models. Presumably the very latest models and the premium redband model or Alfines are even better than mine.
 
I intend to do a proper review at some point in the future, but for now, based on ‘fit and forget’-ability so far I’d give it 9/10.

Wednesday, 21 July 2010

Nexus Mudguards (pt 2)

I got the Mudguards today after a visit to the local royal mail depot, where they have a nice collection of Mailstars parked up*

Nice and shiny with some go-faster stripes.
They didnt come with the various fitting bolts I would need since they were a cheapo (ish) set off ebay. But I knew the tin of bit'n'bobs in the garage would easily solve that issue.

Fitting mudguards is easy and they weigh barely nothing. So it amazes me sometimes when I see people cycling along in the wet, sending a huge splatter of mucky road water all over themselves and anyone behind them. Seems to me its yet another symptom of how cycling is viewed in this country compared to say Holland or Denmark - i.e. over there most biycles with come with mudguards already fitted.

This being a big fat 65mm wide set of mudguards means that a set for skinny tyres must weigh less than nothing.

The only tricky bit was getting the line of the circumference of the guards to match the tyres closely. the stay are adjustable to help you do this, but there was still a huge gap between guard and tyre down near the bottom bracket. So I hacksawed a little aluminium spacer in half to give a slightly better profile.


Done!


*Mailstars are under threat of extinction if the previous head of Royal Mail gets his way as I found out from posts on Manchester cycling.

Tuesday, 20 July 2010

Nexus 8 Build (part 1)

I'd been thinking of building up a hub gear bike for the everyday commute for a while, when I came across the bargain singlespeeds they are selling at Decathlon.

£69.99 sounded to good to be true, but after a quick inspection and ride up the aisle its easy to see that, for the money, its suprisingly decent piece of kit.

Heres the basic bike, it's a B'twin Vitamin in a lovely bright orange! (ignore the floppy chain, I'd already started the build when I took the photo)


So the plan was, get the bike then scout out ebay for potential hubs. Plenty of choices available. 3 speed Sturmey Archers?, 5 speed sachs?, nexus 7 or 8 speeds among others. Initially I thought it would make a good project to try and do my first wheelbuild, but when a full 26" wheelset with a Shimano Nexus 8 speed & tyres came up and decided wheelbuilding would have to wait for another day.

Here's the wheelset:
They came with a 20 tooth sprocket, twistshifter and decent Schwalbe City Jet tyres.


Now the 20 tooth rear sprocket combined with the 36 tooth chainring already on the Vitamin would give me gear inches of approx 24-75, which is fine, but not quite high enough for what I think I would like. So a smaller rear sprocket will be getting bought later on.

The Vitamin came with a an 18 tooth bmx style freewheel on the rear, meaning I would have to extend the chain by a couple of links. Luckily I an sram pc-1 leftover from when I changed the chainring on my Brompton. The sram chain was even the correct length already.

Slotting the rear wheel in is pretty straight forward. These nexus hubs have a mechanism on the drive side which rotates centrally around the axle in order to change gear. As opposed to the in and out mechanism I'm used to seeing on Sturmey Archer hubs. This Shimano solution works very nicely though and and is easy to adjust as there are a full set of yellow and red markers which will all line up correctly when the Hub is in 4th gear (1:1 Direct Drive)

There are a variety of anti turn washers for these hubs, depending on what kind of dropouts your frame has. The idea of the Anti-turn washers is to align the shifting mechanism in the correct direction and keep the axle fixed in one direction. Mine has the traditional horizontal dropouts because it is built to be a single speed, which is perfect because it means less fuss for me and it makes is easy to adjust the chain tension. Virtually any older frame will be similar though. As usual with cycling, for more detail turn to Sheldon.


Here is the locknut that attaches to the shifter cable and slots into the mechanism on the side of the hub:


Once the rear wheel was in it was just a case of routing the cable down the chainstay arm and up the frame. Cable ties for that job. making sure the cable routed away from the chainring, just in case.

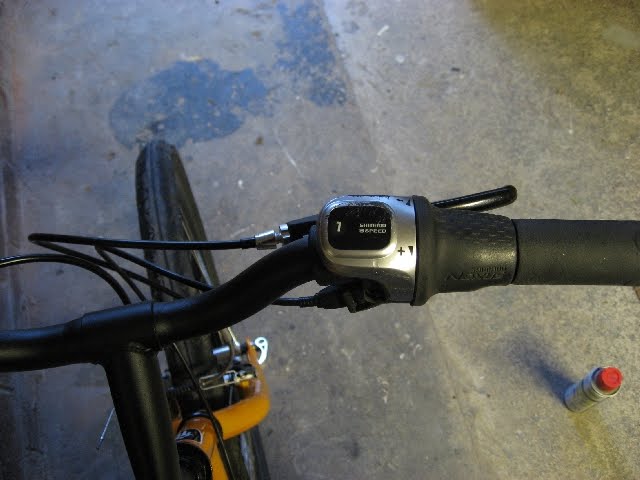
Another beauty of hub gears.....only one shifter to worry about. Easy to mount on after moving the brake lever a bit to give enough room for the grip to go back on ( I might swap the grips later on as they feel a bit gummy for my liking)


Here's the job done. Simple. when I orginally bought the wheelset I had been thinking I would swap the tyres for some dependable Schwable Marathons, but after seeing it complete I really like the extra chunk that the 1.95 city jets give, so I'll be keeping them for now.


Just waiting for some black mudgaurds to come in the post and it will be ready for all weathers.